If you have a mechanical keyboard for your computer, you probably are aware that dust and dirt can easily get trapped in between the keys. Not to mention, the tops of the keys can get sticky if you aren’t careful. The good news is that we can show you how to clean a mechanical keyboard so that it works like new.
How do you clean a mechanical keyboard? To clean a mechanical keyboard, it’s important to unplug it before wiping it down or getting between the keys. Removing the keycaps makes it possible to clean the keyboard more deeply. Vacuuming the keyboard is a nice compromise as it can get deeper than cloth but can work with the keycaps on.
Whether you want to clean your mechanical keyboard on the surface or give it a more thorough cleaning, you must know how to protect everything. That way, you don’t damage your keyboard or any of the keys and other parts.
We hope you love our tips & how-tos. Office Solution Pro is supported by its readers. This post may contain affiliate links. We may earn a commission at no additional cost to you.
Watch This First
If you’re short on time and would like a visual guide on how to clean mechanical keyboards, check out this short and gross keyboard cleaning.
1. Surface Cleaning
One of the easiest ways to clean your mechanical keyboard is to clean the surface. If you use your keyboard a lot, you should wipe it down each day. That way, you can keep the keys from getting sticky, and you can wipe off any dust before it builds up between the keys.
To clean the surface of your mechanical keyboard, unplug it from the computer so that you don’t have to worry about any data input on your computer. If the keyboard is on when you clean it, you could accidentally hit something, affecting your computer. Unplugging the keyboard is a surefire way to avoid accidentally turning off your computer or causing other problems.
After you unplug your computer, dampen a microfiber cloth. Don’t get it too wet, but if you do, you can wring it out before you use it. Then, carefully wipe down the keys and the other parts of your keyboard.
Avoid using a paper towel or a cloth, as the paper can leave particles behind. They can also create tiny scratches on the keys and the keyboard if you aren’t careful. Microfiber is the best option, but if you don’t have that, use another material that won’t shed or scratch your hardware.
2. Use a Vacuum
Unfortunately, it can be hard to clean between the keys with a simple microfiber cloth. To get a bit deeper, you can use the hose extension on your vacuum. The extension will give you leverage over the angle, and the vacuum itself can suck up smaller particles that you can’t get to with your cloth.
- For this, keep the keyboard unplugged. Not only will this keep you from hitting things on accident, but it means you can adjust the angle of the keyboard.
- Connect the hose extension to your vacuum and make sure it’s secure. Bring the vacuum and keyboard within reach of each other.
- Turn the vacuum and hold the hose over the keyboard. This will help suck up any dirt or dust between the keys.
- You don’t have to get the vacuum too close to the keys, but it should be close enough to get the dirt or dust out.
A alternative to vacuuming your keyboard is using an air pump blower. They are easy to use, and it can get between the keys. This convenient blower is designed for dusting and cleaning hardware with small, hard-to-reach components. This air pump blower is built for other applications and is equipped with nine easy-to-use nozzle attachments, making your life at the office easier.
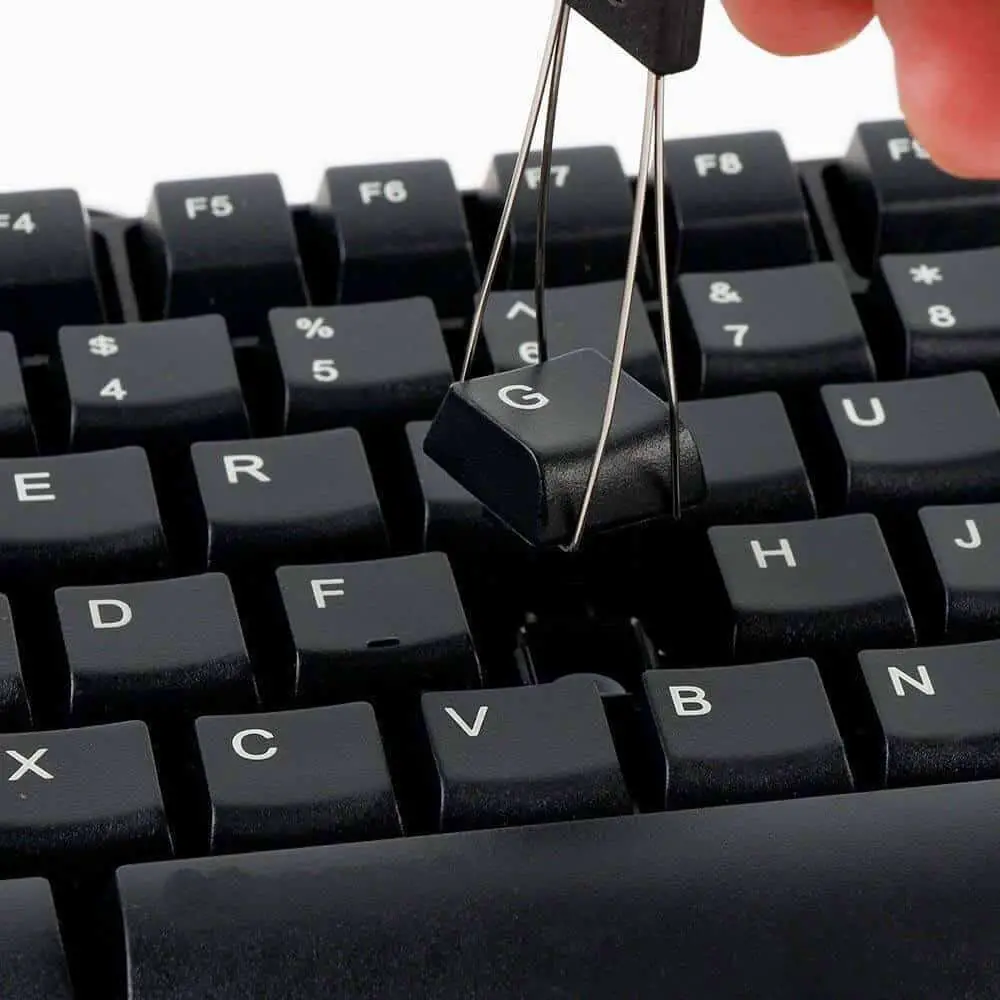
3. Remove and Clean the Keycaps
If you need an even deeper clean, you can remove the keycaps from your keyboard. Not only will this help you clean between the keys, but it can help you deep clean the keys themselves. You don’t need to go this deep that often, but consider taking this step whenever you have some time when you won’t use your keyboard.
Before you remove the keys, take note of where each one goes. Even if you know your keyboard well, it can help to take a picture of the layout. When you go to replace the keycaps, you won’t have to worry about putting them back incorrectly. Take a photo of your keyboard first!
In most cases, you’ll need to use a keycap puller to remove the keycaps from the keyboard. Most keyboards have the keys somewhat inset, so it’s not always possible to remove them yourself. However, if your keys are set higher up, you can take them off without a special tool.

Be extra careful when you remove the larger keys, as they have extra parts to keep them in place. Once you remove all of the keys, please put them in a bowl and fill the bowl with water and dish soap. Hand wash the keycaps and let them soak to get all of the dirt and grime off.
Finally, rinse the keycaps and put them in a strainer to get the excess water out. After that, let them air dry in a place with enough air circulation. Drying can take a while, so it can be a good idea to do this step before bed so that the keycaps can sit for several hours.
4. Clean the Keyboard Plate
While you let the keycaps soak or after you set them out to dry, it’s time to clean the keyboard plate. The keyboard plate is where a lot of dust can collect, so you should take the time to clean it. You can then follow similar steps to clean the keyboard plate as you would for regular cleaning.
- Use a damp microfiber cloth to wipe down the keyboard plate, but make sure the cloth isn’t too wet. The plate is especially important to keep dry since it’s close to the inner circuitry of the keyboard.
- If you can’t get all of the dust that way, you can also use a vacuum hose to suck up any excess dirt or dust.
- Another option, which is nice for smaller areas, is to use a Q Tip to clean between where the keys go.
- You can brush the entire keyboard plate with a small paintbrush to get into some cracks. Just make sure your paintbrush is clean and that the bristles won’t come off and get stuck on the keyboard.
The better you can clean the keyboard plate, the less often you will have to disassemble the keyboard. It can be a time-consuming process, so you want to take advantage of having the keycaps off. If you need to clean the keys later, you can use one of the simpler methods.
5. Reassemble the Keyboard
After you let the keycaps dry completely and clean the keyboard plate, it’s time to put everything back together. Grab your phone or camera and pull up a picture of the layout. If you didn’t do that, you can look up your keyboard online and find the layout.
A photo will help you determine the correct layout for your keyboard, which can be especially helpful if you have a larger keyboard and don’t know where everything goes. Now’s the time to start putting keycaps back in place. Again, be careful with the larger keys so that you put them in securely without breaking them.
You can use whatever method to put the keycaps on, whether working from one side to the other or starting in the middle. The most important thing is that you don’t scratch or break the keycaps.
How Often to Clean Your Mechanical Keyboard
There’s no exact frequency for cleaning your mechanical keyboard, but some methods are better for certain timelines than others. How often you use your keyboard can also affect how often you should clean it. Consider a few factors when deciding how often to clean your keyboard and what methods to use.
- Think about how much you use your keyboard and what it’s exposed to regularly. If you use it every day, you should clean it more often than if you hardly use it.
- Eating near your computer can also necessitate more frequent keyboard cleaning so that you can keep food particles from getting stuck in the keyboard.
- If you want to clean your keyboard daily, wiping it down and vacuuming it are the best options. They don’t require disassembly, and you can do them in a few minutes.
- On the other hand, if you want to clean your keyboard more deeply, you should set aside time to take off the keycaps and get into the keyboard plate.
- You probably won’t want to do this too often, but every few weeks to once a month can be a nice option, especially if you use your keyboard a lot.
Many factors can determine how often you should clean your keyboard and what method you use. As you decide how and when to clean your keyboard, keep these factors in mind. Your cleaning routine may change as your computer use changes, and that’s okay.
Simple Method to Clean Mechanical Keyboard
If you’re looking for a quick and easy way to clean your mechanical keyboard, then you can buy a universal cleaning gel to get the dust and dirt in a matter of seconds.
Using the universal cleaning gel is a breeze as all you need to do is knead it into a ball, press the cleaning gel slowly into the keyboard or any other rugged surface and then pull it out. The dust would be magically carried away with the cleaning gel.

Made of biodegradable material, it will not stick to your hands and will not irritate your skin. What we like is the sweet smell of the lemon fragrance, making your mechanical keyboard look not only lovely but also smell fresh.
This keyboard cleaning gel can be used repeatedly, saving precious time and energy in maintaining your computer hardware. (Think of other things to clean, like your calculator.) If it turns dark, simply get a new one. The only thing you need to remember is not to wash the gel in water.
Don’t leave out your numbers pad if you have one tucked away in a drawer.
If you don’t want to get the gel, check out this method using cardboard.
Final Thoughts
Cleaning a mechanical keyboard can be as simple or complex as you make it. You can wipe down your keyboard daily, and you can also make time to take your keyboard apart to get deep into it. Overall, ensure you’re gentle and careful when dealing with the small parts of your keyboard before, during, and after you clean it.